
Note: Since completing the game, I've read a couple of FAQs that all called this final totem the Death Branch, but I'm certain it's a case of the first person getting it wrong, and everyone else just assuming he/she was right and copying what was already written. In any case, when I look at the totem's image, as well as the projectile it allows Soaring Eagle to fire, I see a dragon. Call it what you want, but I'll be calling it the Dragon totem.

Yeah, it makes my eyes hurt too. Sorry.

Oh, so I buy 6, and get one free?
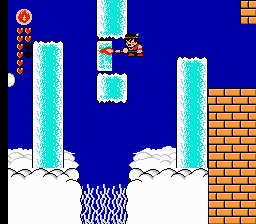
The Final Test is comprised of a set of smaller tests, each of which is connected to the next by a vertical shaft lined with clouds. When you're this high up, I guess the clouds are solid, but springy, since Soaring Eagle bounces on them. The first part consists of dark, dangerous clouds, along with giant pillars, all guarded by miniature versions of the Ice and Secret Guardians. The Dart helps Soaring Eagle climb the pillars, while the Spear Whirlwind is necessary to break through weak spots in some pillars.
After ascending the first cloud-line shaft, we're greeted by pillars of ice and pits full of what appears to be the same electric seaweed you might have seen in the first Teenage Mutant Ninja Turtles game on the NES. The Dart comes in handy once again, as does the Fire Wand, which melts parts of certain pillars. Here, the enemies to worry about are miniature Water and Forest Guardians, though they act just like the guardians from the first area. As much as I wanted to use the Cloud here, I found it was too slow to avoid the Forest Guardians that patrolled the seaweed pits.
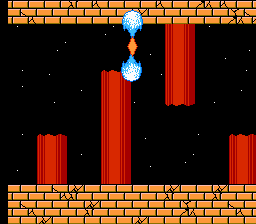
The third part of the test throws a bit of a curve ball: ZERO GRAVITY. After stepping off the first platform, Soaring Eagle begins to float up and down, bouncing off any surface he touches. He can only use his spear to push himself to the left or right, and is otherwise at the mercy of the many platforms and columns that line the way. Gas clouds pursue him through this section of the stage, and since the upward and downward aerial attacks don't work properly here, the clouds must be avoided. My first attempt at the stage ended here, mainly because I was almost out of life by the time I reached the third area.

This is why they call him Soaring Eagle.

The dark parts of the clouds hurt for some reason.

I could use a helmet right about now.
Hey, a use for the Fire Wand!

It's like a pink frog-filled nightmare.

Aren't cocoons supposed to NOT move?

*ahem* Excuse me.
This level is HARD.
I spent some time practicing my jumping maneuvers on the earlier sections of the stage, and became fairly adept at bouncing off the little guardians, but it still took a few more attempts before I managed to reach the fourth and final section of the stage. I actually made it to the boss a couple of times (we'll get to him later), dying over and over again before finally deciding to collect the rest of the gourds I'd need to fill out my life gauge.
The fourth section made the task a simple one, since the two enemy types there (little Fire and Secret Guardians) both attack by jumping at Soaring Eagle. They take two or three hits to defeat, and are stopped in mid-air when hit. So I found a comfortable spot and then moved back and forth, destroying a series of respawning enemies until I had my twelfth heart. The strategy also allowed me to refill my life gauge, and because I found three magic potions along the way, I was ready to put an end to the final boss.
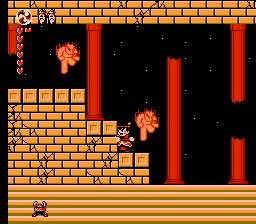
I fight fire with Spear Whirlwind.

Behold, the final gourd!
Final Boss: Majin
Let's not kid ourselves anymore; this game was originally about Son Goku saving the world from the terrible Majin, and since the instructions carefully avoid mentioning anything about what actually happens in the Final Test, we'll just assume they didn't know what to do with him. So he's still the Majin, but now it's Soaring Eagle who has to take him on.
The battle begins with the Majin lurking in the shadows, using his evil magic to summon one of the largest enemies from each stage in an attempt to wear Soaring Eagle down. After the lesser enemies have been taken out, the Majin begins his assault. He creates four spheres that quickly move outward diagonally, bouncing off every edge of the screen, and then he fades out and reappears in another position in the room. The spheres are difficult to dodge with everything going on, and I found myself getting hit by nearly every one of them. Platforms also appear that float up and down, but I never bothered trying to jump on them, since the Majin takes damage no matter where you hit him.
And hitting him is the problem; though Soaring Eagle's spear does do damage, it would probably take twelve to sixteen hits to deplete one of those little circles that represent his life. That's why the Dragon totem is so important: one hit from it does one full circle of damage. However, each use of it also does a full heart of damage to Soaring Eagle. I wasn't worried this time, though; I was always weak when I reached this point before, but now I was full-powered. By the time I had finished off the Majin, I still had a potion left over, and almost a full life gauge.
As the ground trembled, the Majin began to crumble and fade away. Soaring Eagle then took to the skies once again, his quest complete. He returned to the Earth and held up the seven totems, and as the spirits of his ancestors watched from high above, flowers bloomed all around him as a celebration of his ascent into manhood.
See, I make it sound much more epic than it actually was.

Now, we finish this!

Beware my little dragon!

Ooh, holes AND a fade-out? I really won!

And so, Soaring Eagle returns to his home planet?

I like the little bow and smile at the end.

A whole staff roll of pseudonyms.
And that's it for Whomp 'Em! At least I managed to get it finished up by the end of March. And since this was the 19th game played through for the blog, I think it's finally time to get started with Dragon Warrior IV.
Hopefully, I'll be a little more timely with my posts for this one.


No comments:
Post a Comment